Resources
Faculty Open HPC Laboratory
- GPGPU HPC Cluster
- Cloud computing
- Data storage
- Processing platform
GPGPU Cluster
- 2 x GPGPU nodes
- Model: Dell PowerEdge XE8545
- CPUs: 2x AMD EPYC 7413 24-Core Processor
- Memory: 1 TB
- OS: Ubuntu
- 4x NVidia HGX A100 80 GB GPGPU
- NVLink Redstone
- SLURM cluster management
- Job submission
Cloud computing
Openstack cloud
- 3 x OpenStack Cloud Controllers
- Model: Dell PowerEdge R650xs
- CPUs: 1x 20 core Intel(R) Xeon(R) Silver 4316 CPU @ 2.30GHz
- Memory: 128 GB
- OS: Ubuntu
- 4x NVidia HGX A100 80 GB GPGPU
- NVLink Redstone
- 10 x OpenStack Compute node
- Model: Dell PowerEdge 750
- CPUs: 2x 32 core Intel(R) Xeon(R) Gold 6338 CPU @ 2.00GHz
- Memory: 1.5 TB
- OS: Ubuntu
- Total
- Computing power: 640 cores
- Memort: 15 TB
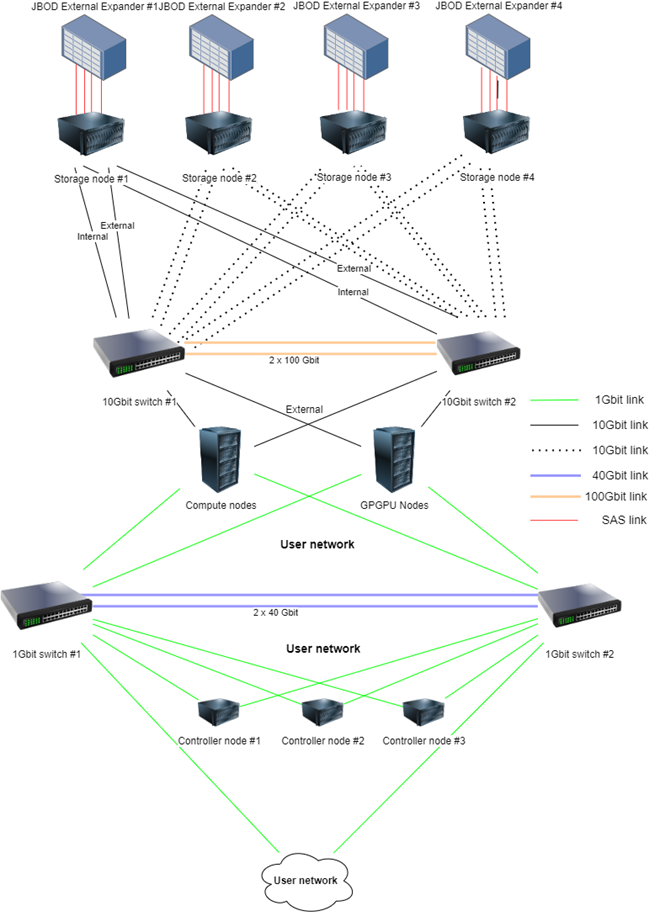
Data storage
Data storage nodes
- 4 x Ceph Storage nodes
- Model: Dell PowerEdge R750xs
- CPUs: 2x 20 core Intel(R) Xeon(R) Silver 4316 CPU @ 2.30GHz
- Memory: 512 GB
- OS: Ubuntu
- Storage:
- 2x 480 GB SSD (OS)
- 2x 960 GB mixe use SSD
- 4x 400GB write intensive SSD
- 4 x JBOD External Expander
- SAS Disk Enclosures with a capacity of 84 disks
- SAS, SATA and SSD intermix allowed
Interconnection
- 2 x 48–port 10 Gbit switches interconnected with two 100 Gbit connections – Cloud/Storage network
- 2 x 48-port 1 Gbit switches interconnected with two 40 Gbit connections – External network
Lab overview
Software
- SLURM scheduler
- Nextcloud
- Datahub
- Soon
- Kubernetes cluster
- JupyterHub
- Spark cluster
- Deployment of on demand tools
Access to resources
Application process
- Use the simple form on the web page of the Open Science Lab:
- Explain your project and required resources and the Lab council will review your application.
Usage of GPGPU resources
Process
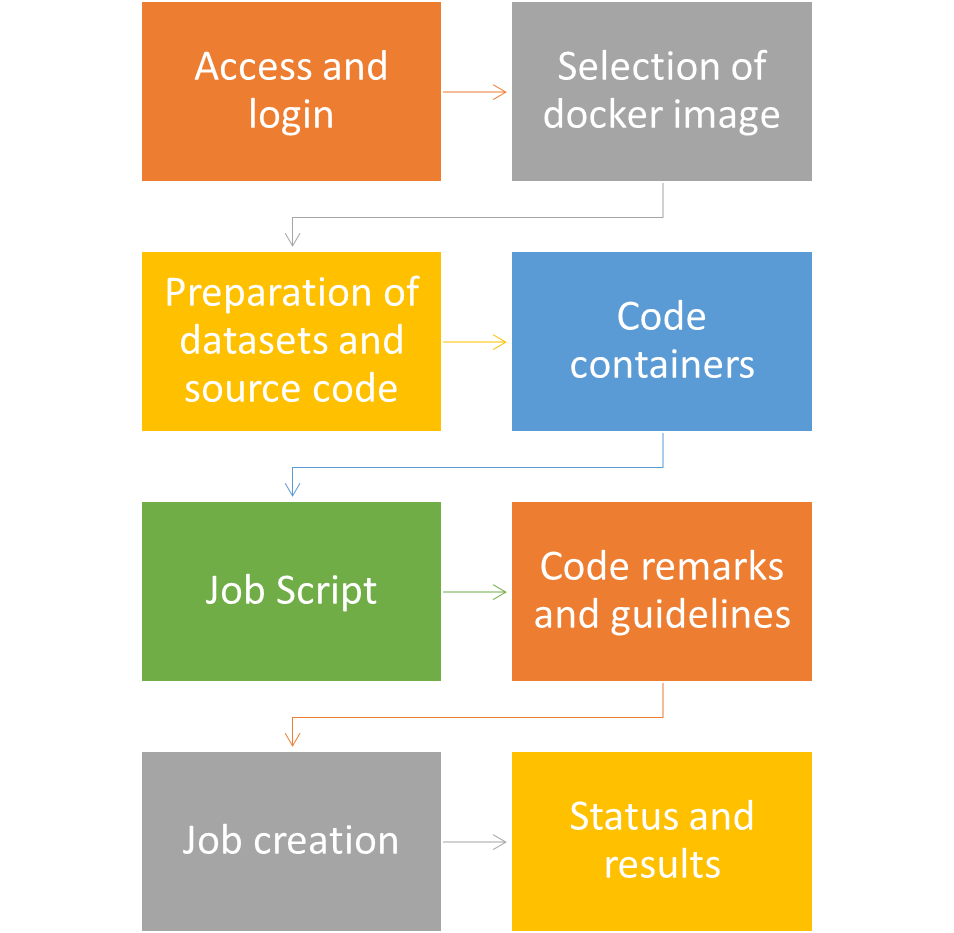
Access and login
- Generate SSH key or use your existing SSH key
- Login to https://osc-lab.finki.ukim.mk/ and in your profile add your SSH key
- You will receive information about the username created on the GPGPU cluster.
- Connect to EDUVPN service for OpenLab
- Use SSH client to login to the address 10.10.65.6 (GPU cluster front node) using ssh key
- ssh -i <PATH_TO_PRIVATE_KEY> USERNAME@10.10.65.6
Selection of docker image
The easiest way to run a GPGPU code is using dockerized version of the software/libraries that your code is based on. We use NVIDIA NGC catalog as a source of docker images with preinstalled software/libraries/models that we use in our code.
For example, if our code trains a model using a library based on pytorch, we can use the following docker image (replace XX.XX with needed version available on NGC):
docker image pull nvcr.io/nvidia/pytorch:XX.XX-py3
Ex.:
docker image pull nvcr.io/nvidia/pytorch:23.05-py3
Preparation of code and datasets
In your home directory /home/hpc/users/ create a code directory that will contain the code, data and job stript.
The code, data and results directory will be connected to your singularity container
—JOB_FOLDER_NAME
—Dockerfile (**optional)
—code
—data
—results
— …
— job.py
Following steps need to be executed from this directory
Creation of code conteriners
Singularity is a containerization platform that enables running containers that contain different pieces of software in a portable and reproducible way. Singularity as a platform was created to enable the execution of complex applications on HPC systems by favouring integration over isolation and thereby making it easier to use GPU units, cluster data systems, etc.
Containers that are created in the singularity platform are files with a .sif extension.
Creation of code conteriners – step one
If you need to install additional libraries or packages (besides what is installed in the image you download from the NVIDIA NGC catalog), you need to create a Dockerfile in your experiment directory.
The contents of the Dockerfile should be as follows:
FROM {NVIDIA_NGC_IMAGE}
RUN {install comands here e.g. pip install pytorch-geometric}
Once we are ready with the Dockerfile, we need to create a new imagedocker build -t DOCKER_IMAGE_TAG .
eg.
docker build -t pyg .
Creation of code conteriners – step two
If you do not need to install additional libraries or packages (other than what is installed in the image that you will download from the NVIDIA NGC catalog), you proceed directly to creating the sif image with the following commands:
docker save DOCKER_IMAGE_NAME -o ARCHIVED_DOCKER_IMAGE_NAME.tar
singularity build SIF_IMAGE_NAME.sif docker-archive://ARCHIVED_DOCKER_IMAGE_NAME.tar
DOCKER_IMAGE_NAME can be the name of the image downloaded from NVIDIA NGC or the name of the image created by you by running a Dockerfile buildARCHIVED_DOCKER_IMAGE_NAME and SIF_IMAGE_NAME are chosen by you and may refer to the library/model you are using.
Creation of job script
In the same directory that refers to your experiment/job add a shell script named job.sh.
The content of the script:
#SBATCH --job-name CudaJob
#SBATCH --output result.out ## filename of the output; the %j is equivalent to jobID; default is slurm-[jobID].out
#SBATCH --partition=openlab-queue ## the partitions to run in (comma seperated)
#SBATCH --ntasks=1 ## number of tasks (analyses) to run
#SBATCH --gres=gpu:3 # select node with v100 GPU
##SBATCH --mem-per-gpu=100M # Memory allocated for the job
##SBATCH --time=0-00:10:00 ## time for analysis (day-hour:min:sec)
# parse out number of GPUs and CPU cores assigned to your job
env | grep -i slurm
N_GPUS=`echo $SLURM_JOB_GPUS | tr "," " " | wc -w`
N_CORES=${SLURM_NTASKS}
#export SINGULARITYENV_CUDA_VISIBLE_DEVICES=${CUDA_VISIBLE_DEVICES}
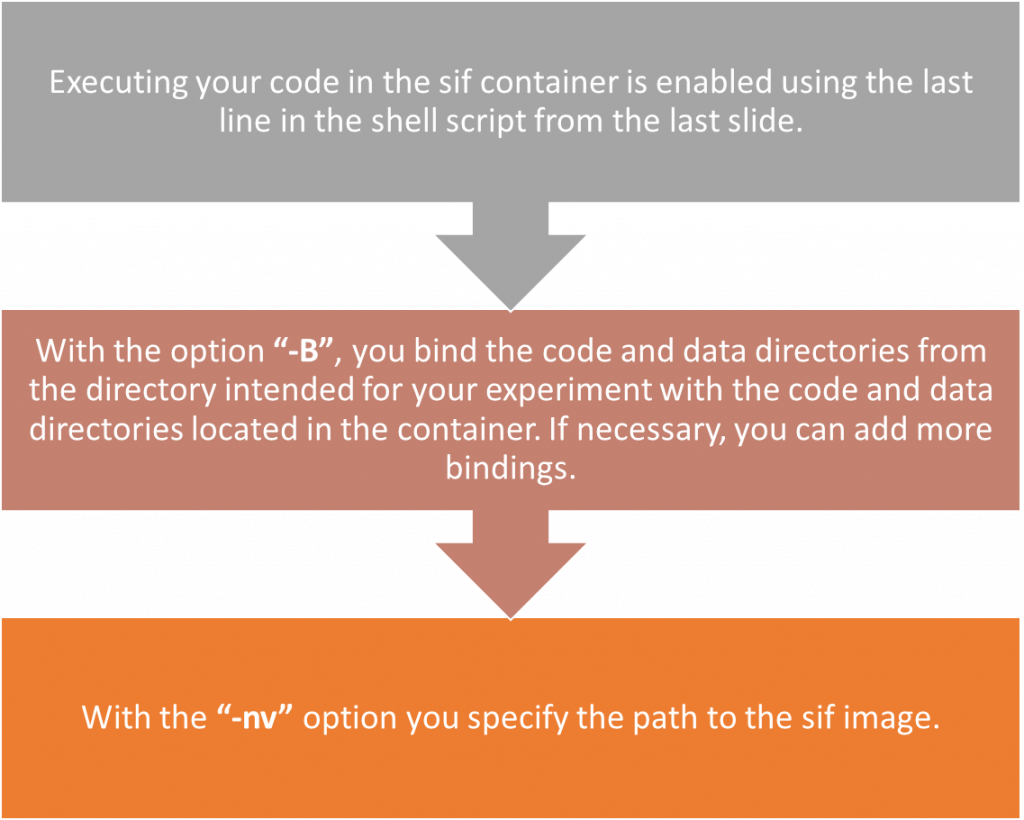
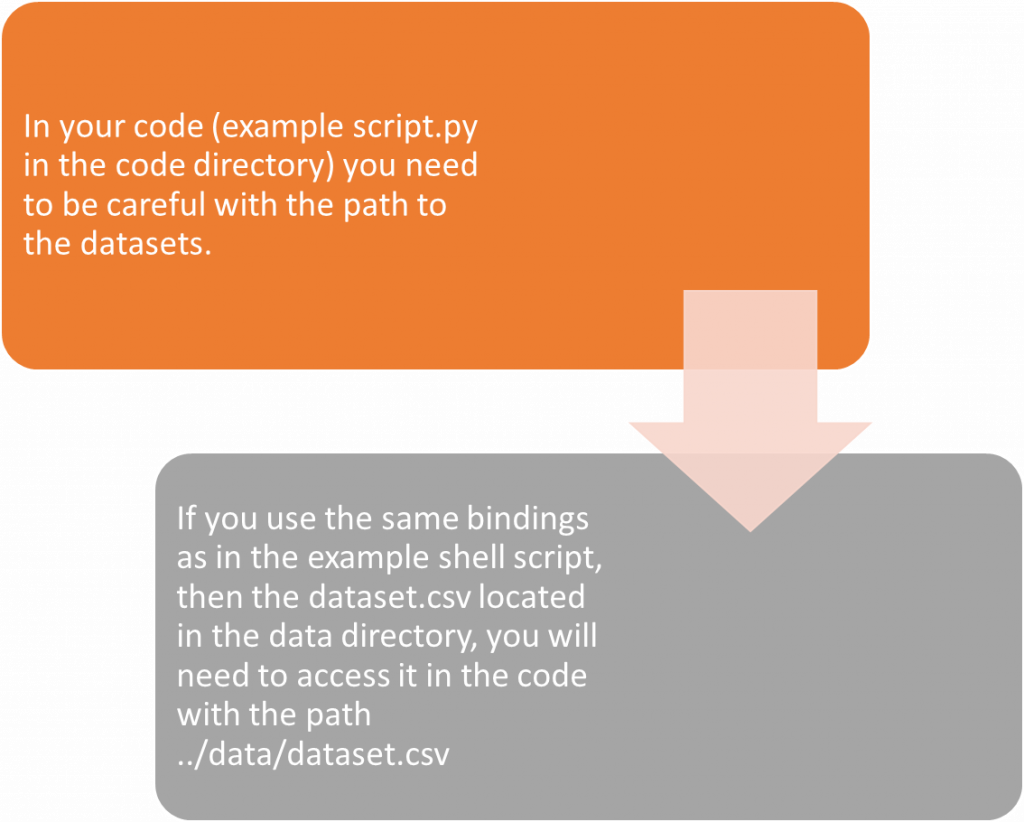
singularity exec \
-B ./code:/code \
-B ./data:/data \
--nv SIF_IMAGE_NAME.sif \
python3 code/PYTHON_SCRIPT_NAME.pyCreation of job
Code remarks and guidelines
Job execution
The jobs are executed completely identically to the already existing slurm (instructions available here).
The sbatch command queues the job.
Ex. sbatch job.sh
(Note: you still need to be located in the directory created for the experiment)
Job status
- squeue (checking the status of all queued jobs)
- sinfo (checking the status of nodes and partitions in the cluster)
- scancel (stop the task (or multiple tasks), by defining id)
- sacct (information about completed and ongoing tasks, as well as the users who started them)
- sstat (current task data and user information)